Saturday, December 10, 2011

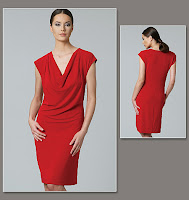
Finally - a review of my Mother of the Bride dress! (S2497)


Took me awhile but I'm finally getting around to blogging / reviewing Simplicity 2497 - a Cynthia Rowley design that is nominated for top ten patterns in 2011. I made a muslin here and had to make a few tweaks to the bodice to make it fit. (Full review at Pattern Review if interested.) I made a bolero jacket to wear over it but didn't like it when it was done so I left it off. Forgive the wrinkles in the dress. The photo was taken at the end of the evening as you can tell by the wine-enhanced giant eyes!

Shoes are A. Marinelli Excess and came from Zappos. No longer available at Zappos but they may be available from other vendors. Not sure if you can tell in the photo but the back is silver and the front is a sheer, sparkly mesh; the medallion on top is made from a bunch of strands of silver beads. They are much nicer in person!


This is the cute little bag I carried, which I found at at T.J. Maxx! It is silver with a black lace overlay.


Overall, I'm happy with the dress. I've actually worn the outfit two other times since the wedding.

Christmas Appetizer


My daughter and son in law are hosting their first Christmas party tonight and she asked me to make a couple appetizers. Veggie bars are always yummy and this variation is perfect for a Christmas party! It's a Pillsbury recipe found here.

Wednesday, December 07, 2011

What to do when you're missing your sewing machine...


Mark and I spent the week after Thanksgiving at our home in Florida. We love our time down there because we truly get to relax. Even though I worked during the day and even visited a client, we still took advantage of the lovely weather for long walks every morning and had lots of fun time in the evenings. Once we retire we plan to spend our winters down here but for now, we take advantage of long weekends or weeks when we can make it work with our work / family schedules.

Ultimately, I intend to sew during our extended stays and we even had a Murphy-style bed built into the spare bedroom so when we don't have guests, it can be my sewing room. I came T H I S - C L O S E to purchasing a used machine last week to keep in Florida but I decided that due to our infrequent trips, it doesn't make sense right now.

But I can't go a whole week without sewing! So over the last two trips, we've assembled a cutting station that allow me to at least cut out patterns while I'm down there so they are ready to be sewn when I get back home. We picked up a folding table and risers from the hardware store and purchased other supplies - cutting mat, rotary cutter, pins, chalk marker, tape measure, scissors. On this trip, I brought fabric and patterns and came home with 11 projects cut out! All are marked but a few require interfacing and / or linings (which I forgot to bring). I bought some 2 1/2 gallon Hefty zipper bags and they are perfect for storing the projects.

I have already finished one top, which I'll review later in the week. Here is a list of the projects:

1. Glittery knit sleeveless cowl top similar to this one;
Fabric: sweater knit with gold thread running through it, from TexStyles during PR Weekend in Austin
Pattern: M6078 view B
I finished this before work this morning to wear to a Christmas party on Saturday!

2. Wool Pants
Fabric: beige wool tricotine
Pattern: McCalls 5239, Palmer Pletsch pattern; custom fitted at pants fitting workshop in Austin

3. Black pencil skirt
Fabric: Stretch corduroy purchased at Banasch
Pattern: Simplicity 2451, View C, like this one

4. Knit LS cowl tunic
Fabric: Confetti print knit from The Common Thread that a bunch of the Austin ladies purchased
Pattern: Vogue 8634, similar to this one

5. Asymmetrical knit top
Fabric: purple jersey
Pattern: Kwik Sew 3790

6. Bolero style knit top
Fabric: Red jersey
Pattern: McCalls 6284, like this one

7. Shirred sleeve t-shirt
Fabric: gray jersey knit
Pattern: McCalls 6164, View A, like this one

8. Sweetheart Neck Top
Fabric: silk cotton rayon from Fabricker
Pattern: Jalie 2794

9. Flannel tie front shirt
Fabric: Black/white flannel with black flannel tie from stash
Pattern: Kwik Sew 3620

10. Shirred front blouse
Fabric: purple stretch cotton
Pattern: Vogue 8747, View C

11. Ruffle Front Blouse
Fabric: red stretch cotton
Pattern: McCalls 5522, (PR Best pattern in 2009)

I have to say... it is quite nice to be able to walk into my sewing room, pop open a project bag and immediately start sewing! I think I'm going to start on # 4 tonight - the confetti tunic.

Tuesday, November 22, 2011

Pattern Review 10-Year Anniversary in Austin


Edited to add a link to Kyle's blog who captured all the events of the weekend so well!
Kyles' Blog: Vacuuming the Lawn

Saturday, November 19, 2011 was the tenth anniversary of Deepika's creation of Pattern Review. All of my fellow sewers know what a great resource the website has become but it has also greatly expanded the "Sisterhood" of sewists. Over the ten years, there have been many meetings and weekends across the world at which PR members gather to share their love of sewing. I attended my first one this past May in Chicago and knew I would attend subsequent events.

Deepika announced there would be events in various cities to celebrate the anniversary so I started reading about the various events to see if I could make any of them work. Cincinnati is woefully barren when it comes to sewing so I knew I would need to visit elsewhere. When I ended up scheduled for meetings in San Antonio the day before the Austin event, I decided to extend my stay and join the Texas group. I am so glad I did! It was a fantastic weekend with 40 members from all over Texas (Austin, San Antonio, Houston, Dallas, El Paso) and a few of us Texas wannabes including Kyle from NJ and Kellie from Illinois.

Leslie organized an amazing event and I think I speak for everyone when I say how much fun we all had. I was too busy having fun to take many photos but here are a few:

Betty, Kyle, Me, Leslie in front of the Aloft bar (where we may have spent just a bit of time)


Enjoying an afternoon coffee to re-energize before the evening events (the Bailey's in the coffee also helped.) Becki, Jennifer, Robyn, Leslie, Betty, Me & Kellie:


Leslie welcoming everyone to Common Threads with Jeannie (owner). A styling session by Thea Woods followed:


Mimosas and a sewing studio tour. Could a Sunday morning get any better?


Inside Juliette's studio:

Monday, November 07, 2011

Rehearsal Dinner Dress - V8742


I finished up the Mother of the Bride ensemble and Junior Bridesmaid dresses (I'll post those soon) on Saturday so I decided I still had time to make a dress for the rehearsal dinner. I've loved this pattern (Vogue 8742) since it came out and decided to give it a shot with a lightweight teal sweater knit I had in my stash. I love how it turned out, although now that I see it, I wish I had made it an inch longer. I liked it yesterday in the mirror but in this morning's photos, I think it's a wee bit short.

Pattern: Vogue 8742


Close up of shirring:


"Rear" View. Literally. :-)


I used hot pink bias tape for the neckline to add a little fun.


There are more details of the construction and pattern at PR.

Note: I have no idea why the hangar says Bill Gilson! LOL. Nobody I know!

Tuesday, October 25, 2011

Vogue 1250 - Version 2


No need to do a review on this one as it's been reviewed to death at PR but add me to the list of people who adore this pattern! This is my second version of this dress (first one here) and I suspect it might not be my last! Fabric is a slinky knit from my stash and pattern is Vogue 1250.

I made this to wear to my daughter's bachelorette weekend in Nashville, TN. On the second night, the bride wore a white dress and the rest of us wore black (see below for group shot sans me who was taking the photo). Initially my accessories included the leopard platform pumps and a CUTE silver/leopard belt (close up shown below) but I had to ditch the shoes. I wore them for a bit in the hotel and knew I wouldn't last long in them so I traded for my back-up pair of black flats. And thank goodness I did because we were out that night until 3:00 am! Oh... the pink necklace and bracelet were not part of the outfit - they were bachelorette party accessories! (More bachelorette weekend pictures on Facebook.)


Thursday, October 20, 2011

Missoni-ish Fabric - Pattern Suggestions?


To be honest, I don't love the classic Missoni zig zag look. I know... I know... it's the hottest thing out there right now but it never really set me on fire. But I walked into Banasch's Fabric the other day to shop their penny sale (buy 2, get 1 for a penny) and this fabric was right by the front door. I stopped and fondled it and moved on. After going back to it 3 times, I realized that I must really like the look. LOL. So I bought a couple yards to make a knit dress. After looking through my stash, I didn't find a specific pattern that I love so I'm requesting suggestions for pattern ideas! I want it to be a fall dress so I prefer sleeves but most sleeveless patterns can be adapted.

Vogue 1250 - Version 1


When Vogue 1250 came out, it didn't interest me in the least. I thought the dress was not the slightest bit flattering on the model. Doesn't the dress look baggy in an unattractive way in the following image?


But apparently, my opinion was in the minority and versions of the dress started popping up all over the Blogosphere and Pattern Review. And the versions were CUTE!! And SEXY!! Most people also described that the dress was quick and true to size. So let's see.... knit dress.... cowl neck.... cute.... quick... true to size... many of my favorite pattern characteristics!

The pattern languished all summer but the need for a quick dress arose when I was packing for Jackson Hole last month. I needed something cute and casual for a cocktail reception. So I pulled out a lightweight interlock from my stash and pulled together the above dress in about an hour and a half, including cutting. It's comfy and casual and I was thrilled with how it turned out.

I finished Version 2 this morning and will post about it next week. I used a black slinky knit for this one and I'll wear it to my daughter's bachelorette party this weekend. She is wearing a white dress and the rest of us will be in black.

Thursday, October 06, 2011

Wedding Shower

My daughter's wedding shower was last Sunday and it was great fun! I prepared the food and tried out some new recipes. I wish I hadn't been so frazzled at the start - I forgot to take photos of the food. The complete menu and links to the recipes where applicable:

Sparkling Sangria

Cranberry / pineapple juice (frozen berries )

Chutney Cashew Baked Brie with baguette slices

Cranberry Apple Brie with baguette slices (A Pampered Chef recipe)

Shrimp Cocktail dip with buttery cracker dippers (my own recipe)

Individual Greek Salads – My daughter's high school friend is the Caitlin behind Cooking with Caitlin. Her website has lots of great recipes!

Two types of sliders:

Rosemary Garlic Roasted Pork tenderloin with Aioli & Roast turkey "Bobbies" (dressing & cranberry on top) (My recipes)

Olivada Pasta Salad

Italian Pasta Salad (my recipe)

Fruit salad

Cupcakes and Cookies from Bonbonnerie

We ordered a "prototype" of her bouquet as the centerpiece:

Her guests were incredibly generous!!! She received so many fantastic things. And I must admit I got a lot of pleasure out of watching her open the gifts I made!

The Apron:


The Stockings & Christmas Ornament:


The Cookbook - made her cry!


We had a lot of fun but it was fun to relax with my family when it was all over!


Five weeks to go!

Wednesday, September 28, 2011

Finishing Touches on the Christmas Stockings

I finished knitting Christmas stockings for my daughter and her fiancé in July but I still wanted to add their names somehow. I ruled out knitting the name but considered embroidering or sewing something. After mulling it over awhile, I decided to do some sort of hanging name label. I originally pictured oval but ended up with a rectangle. This is what I came up with:


Sewing Details:
I embroidered their names on some white cotton. I basted ribbons, sewed the top to an interfaced white cotton back and turned right side out. After pressing, I basted the opening closed and then I used my Bernina to do a decorative stitch around the edges to simulate hand applique. (Click on the photo to zoom in and see the detail.) To attach to the stocking, I simply pulled the ends of the ribbons through the stocking (back to front) and tied with a bell.

The stockings will be given along with a "First Christmas Together" ornament (stamped copper) that I purchased from an Etsy vendor (Charms of Faith). It hasn't arrived yet (hopefully today!) but the seller sent me the following photo.

Tuesday, September 27, 2011

My new favorite gadget


I found the most awesome tool for us bloggers! It's called a Gorillapod - it's a mini bendable tripod that can grip almost any surface. I saw the "contraption" (dontcha love that word?!) in photos on Kyle's blog and googled until I figured out what it was called. It's sold by many vendors but I purchased mine for only $14 with free shipping from Amazon. It comes in a lot of colors (red, blue, yellow, green, grey) but I bought the adorable pink one shown above.

I've already used it a few times to take photos of myself and also a few of my fiancé and me when we were on vacation recently. Handy when you don't have a spare body close by to take a photo!

If you like to take photos of yourself modeling your creations, I highly recommend!

Family Cookbook

Fortunately, my family ignores the fact that I have a blog so I can post about family presents and they'll never see!

I mentioned in the previous apron post that I made a family cookbook. I've had the idea to do this for a long, long time but could never decide how to go about it. I considered one of the compilation style cookbooks with the plastic or wire comb binding that many publishers offered but I wanted to include photos and generally speaking, photos aren't an option. I thought a better way to go was with a photobook offered by various vendors (Snapfish, Shutterfly, Picaboo, etc.) Here is what I came up with (I took photos of the cookbook and created a collage with Picasa):


You can click on the photo and enlarge it several times if you want to see details.

If you're interested in the details of how to make one, continue reading! Otherwise, click to the next blog.

The books can get rather pricey - the version I purchased starts at $25 for 20 pages but in July, Snapfish came out with a buy one get TWO free deal. After shipping and tax, the total was $40 for 3 ($13 each). I want to make 9 to give to various family members but the offer was limited to 3. However, lo and behold, they offered the deal again two weeks ago so I bought 3 more! Hopefully, they'll have the deal again before the holidays so I can get the final 3.

It took some time to pull together but part of that was learning Snapfish's editing process. Everything that will be uploaded must be a jpg file. There may be a better way to do it but I started with a Word document for each recipe, printed to pdf and then used an online service to convert from pdf to jpg.

Snapfish has tons of page layouts - anything from one large jpg file per page to 12 or more jpg files. Some layouts have text boxes. So I varied the pages and figured out how to fit approx 25 recipes on the pages along with family photos, food photos plus a cover page and dedication page. Originally, I tried to crop the jpg's to fit the photo box but realized that is not necessary - it works better to do the cropping in Snapfish. Now that the book is a saved project, I can order more from Snapfish whenever I want.

I love all the options available. Different cover styles (I picked my favorite color in a linen cover); different "themes" for the pages (again purple!) and of course all the page layouts, photo sizes, fonts, etc.

It was a fun project and I'm happy with the results. I hope my daughter likes her cooking themed present! I'm finishing up another project for her tonight that I'll post about later in the week.

Thursday, September 22, 2011

Shower Gift - Emmeline Apron


I made a cookbook via Snapfish to give to my daughter at her shower next week. I used favorite family recipes and included lots of photos of not just the food but also photos of the family members who like the recipes.

I decided to also make an apron to go with it. Ages ago, I spotted the following apron on a site called Aprons Boutique only it had hot pink/white polka dot trim instead of red. I LOVED the color / pattern combination.


I had always planned on making something similar for myself but other projects always trumped it. I know my daughter will love the color combo so I made the above apron for her instead. (Plus, if she doesn't like it / wear it, I will steal it back from her!) I really wanted to use striped fabric but couldn't find a woven black/white at JoAnns or Hancocks so I opted for the stripe-like print on one side and a black/white paisley on the other. I don't like the bow trim on the neck strap so I am removing that.

I used the Emmeline Apron pattern that it completely reversible. I used it once before for a Valentine-themed version for my friend Jen but never posted a photo of it. I didn't realize until I was writing this entry that I had used a black/white paisley for that version, too. I guess I like that pattern! Here is the Valentine version:

Monday, September 19, 2011

Wedding Shower Dress - M6243


My daughter's wedding shower is in a couple weeks so I decided to make something new to wear. I picked McCalls 6243, view C and made it from a ponteroma knit from Hancock's (zinnia is the name of the color and I love it!) I added some black piping for zip and love how it turned out. The pattern calls for an exposed zipper in the back. I didn't want that look so I planned on inserting a side zipper instead. Well, after I basted it together for the first fit, I realized I didn't need a zipper at all so I omitted it.


This is one of those pieces of clothing that I love when I look in the mirror but when I see the photo of me, I don't love so much. (Does that happen to anyone else?) I'm choosing to ignore the photo and continue believing this looks good. LOL. Any time I take a photo with an uphill angle, it's bad news.

About the pattern - LOVED it! Couldn't be easier, especially with the zipper omitted! View C without piping trim should probably take less than an hour to sew. The only thing that takes any time is the narrow hems at the sleeves and neck. It took me considerably longer but that's because I kept screwing up the piping - I had to baste three times but I blame the wine I was drinking at the time. :-)

Love, love the ponteroma fabric from Hancocks. Although the bridesmaids are hosting, the shower is at my house and I'm doing the food so this dress will be nice and comfy to wear while I'm scurrying around getting food / drinks ready.