Monday, June 27, 2011

New recipe on Food blog

I just finished the remaining leftovers from a meal I made last week and it was so good, I wanted to write down what I did - I always forget to do that and then usually what happens is about a month after making, Mark will say something like, "Hey, can you make that chicken dish again?" and will be met with a blank stare.

Anyhoo, it is based on a Dr. Oz recipe I found online but honestly, I think my version is better than his. :o)

My recipe here.
His recipe here.

YOU be the judge!

Sunday, June 26, 2011

M6356 - another miss


I am not brave enough to sport the one-shoulder look so I was happy to see McCalls 6356,


View D,

which is a modified one-shoulder look that sort of conveys the same image with less skin showing.

This was a tricky one to sew for me. (More sewing details at Pattern Review.) I'm not crazy with the results. This is a little bit out of my style zone (if I have such a thing.) My daughter said it looks good but I feel like a big red pear in it! My oldest daughter said to try it with skinny jeans. My fiancé said it looks frumpy because he likes fitted tops on me. I'll probably try wearing it out and see if I'm comfortable wearing it.

M6069 - Hmmmm....


M6069 is a ROCK STAR at Pattern Review. I don't think there is a bad review amongst the 29 posted. And I am a knit dress LOVER. But I finished this one about a month ago and I'm lukewarm. Admittedly, I got a little carried away after realizing I had cut the skirt too wide. And sewed the skirt seams tighter than I should have. But aside from the snugness at the hips, it doesn't seem to hang the same way at the neckline as everyone else's. I added sleeves but I wouldn't have thought that would impact how the cowl hangs. I also admitted the elastic casing at the waist. I threw on a skinny belt that I happened to have laying in the sewing room but I think I will wear this with a wide black belt.

(Forgive the open outlet. Just finished painting the room.)

I purchased this lightweight (but substantial enough) ITY border print from Fabric.com.

Bottom line... I guess I'll move it from my sewing room to my closet and I'll wear it but it won't be my fave.

Thursday, June 23, 2011

Christmas Stocking

My daughter is getting married in November so I decided to knit Christmas stockings for her fiancé and her for their first married Christmas together. Here is the first one:


The next one will be the same design and same colors but I'll make the top, heel and toe red and the stripes green and white. Details on Ravelry.

Question for my knitting buddies.... Do I need to block this? It doesn't look like it needs it.

Tuesday, June 21, 2011

Peasant Top (B4685) Finished


Well, I finished the eyelet peasant top I blogged about last week. I still don't love the style on me but thanks to my sewing friend, Eve, I tweaked it enough so it's wearable.

I requested feedback from my sewing buddies on how to improve it and received several tips. Most agreed that an empire waist elastic fix would not be flattering. I tried Eve's tip to tie the elastic around the outside to see what it would look like and confirmed they were correct! Darts were suggested to give it more shape but I decided that wouldn't be ideal because it might require a zipper and I had already serged the side seams. Plus, making the top more fitted would change the style from a peasant blouse to... well... just a plain ole blouse. Several suggested belts (both waist level and just under bust) but I didn't like that either.

I was just going to abandon the top but lucky for me, Eve was on Facebook when I was assessing my options and we had a nice little chat. She was so encouraging and suggested a casing in the back with some eyelet inserted. I was envisioning a short casing in the middle of the back but decided to try a casing across the entire back. I like the way that turned out. Here's a peek:


Thank you, Eve!! I appreciate not only your help but your nice words, Sweetie! I liked Sharon's tip to add a long necklace to break up the white so I did just that!

As a reminder, here are before (on the left) and after (on the right) shots:
Link

Friday, June 17, 2011

Progress on V8574


I pieced together the bodice and basted in a zipper to check the fit. I am thrilled that the top fits PERFECTLY! No need to adjust anything. I started with a 10 on top and graded out to a 12 at the bottom of the bodice.

I pinned the front skirt pieces on to see how it will look overall. I did not try to arrange the pattern any particular way but I really like the way the bodice and the bottom front ended up. Unfortunately, I won't get this done in time to wear tonight but I will find another opportunity soon to debut it!

Thursday, June 16, 2011

We're "taking a break"

My peasant top and I are not seeing eyelet-to-eyelet eye-to-eye so we're going to take a little break and see how much we really care about each other. I received some good ideas from my sewing friends to try out on the peasant but I need a little rest before I go down that road.

So instead, I shifted gears and I'm trying a summer dress. Vogue 8574 to be specific, the short one shown here in an incredibly ugly color.


We're leaving tomorrow with a small group of friends for a weekend motorcycle trip down to Louisville. We're going to Churchill Downs tomorrow night and apparently, there is a "South Beach" theme so I need a flirty dress. A tropical print probably makes the most sense but instead I am going to try out this geometric print rayon that I picked up at Vogue Fabrics during PR Weekend. The colors are awesome and I love the print.


Lee had this fabric first so I stalked her followed her around waiting for her to have some cut so I could see if there was enough for me, too. Somehow she eluded me and I later found it back in the inventory and grabbed it up. Lee must have known I was on to her because she snapped this photo of me checking out the bolt.


If I don't get the Vogue done tonight, I'll pack this one that I made for the cruise last year instead:

A knit dress will certainly travel better than a rayon dress in a motorcycle tour pack anyway!

Wednesday, June 15, 2011

Peasant Blouse - Almost There...

I love peasant blouses. One of the first things I made when I resumed sewing for myself a few years ago was a raspberry colored peasant top. During PR Weekend in Chicago, I picked up some lovely white eyelet from Rainbow Fabrics and decided it was time for a new peasant blouse. Butterick has a nice pattern (4685) out now with multiple variations. I was planning on doing View A (larger image on left in pattern photo below) but when I looked more closely at the lovely border on my eyelet, I thought it would make a nice neckline ruffle so I opted for View C (blue one) instead.

As with most eyelets, the fabric is quite sheer and has large holes so underlining was necessary. I used a white batiste that I found at JoAnns. The top went together quickly and the only adjustment I made was to take in the waist a bit to add some shape. I used my commute to work this morning to insert the elastic in the neck and sleeves. After trying it on, I realize I need to make a few tweaks. I forgot the sleeves hit way up high and cut the elastic too short so I'll re-cut and insert arm elastic. Here is what the top looks like right now:


Yes, that's right. A white shapeless blah. Here is what it looks like if I pull in the sides a bit:


Looks better but I think I would need to insert a zipper to get it on and off. I already serged the seams so that isn't going to happen. Instead, I'm going to add a casing below the bustline like shown in View D and hope it creates the shape I'm looking for.

I would like to finish this one up tonight and any input is welcome!

Wednesday, June 08, 2011

Knitting Projects

I finished up two baby knits recently. The first is a pinwheel blanket for Mark's granddaughter. I LOVE it!! Details here at Ravelry.


I also made a quick little flower hat for my hair stylish who is due in approx. 5 weeks.


I'm also working on Christmas stockings for my daughter and her fiancé. I plan to get them both done in time to be given at her wedding shower in September.

Tuesday, June 07, 2011

Girley Dresses


My fiance's daughter recently gave birth to a beautiful baby girl. I decided to make coordinating dresses for her and her 10-yr old sister. I fell in love with this New Look baby dress:

New Look 6037, View D


And decided on a simple sundress for the other dress:

McCalls 5838, View A with no ruffle


I was happy to find coordinating fabric that was suitable for both a baby and a 10 year old! Although the photos seem to show different colors in the fabric, they are the same stuff! I used the butterfly and polka dots for the baby dress and polka dots and stripes for the big girl dress. The fabric is from the JoAnn's Tutti Fruitti collection. I've used other fabrics from this collection for kids' clothes in the past and really like the way it launders.

I gifted the dresses on Sunday and they were a big hit. I'm now on the hunt for more striped fabric so I can make a shirt (Butterick 3475) for their almost 4 year old cousin (boy) so we can get a cutesy photo while on vacation this summer.

I may even make him a pair of cargo pants to go with the shirt. Would white work for a boy? Or should I stick with khaki?

Monday, June 06, 2011

Black Pencil Skirt - S2451 - AKA the DNP skirt

Here is a long overdue post on my Damn Near Perfect (DNP) skirt I finished over a month ago.


I have wanted/needed a black pencil skirt for ages. Something to throw on for date night or to wear to the office. PR Weekend pushed me to finally make this one as I wanted something to wear with my polka dot top. I wore this on our last day, to the Lt. Gov. proclamation at Fishman's Fabric.

The details:
Pattern: Simplicity 2451, View C (with modifications as described below.)

Fabric: Black stretch twill, origin unknown.

I decided to add the tabs that are shown in View D and made them first. I cut them out, interfaced, sewed, and top stitched them damn near perfectly! Then I began construction of the actual skirt. I glanced at the instructions for the pocket but then put the instructions away. I mean, hello... I'm an experienced sewer. Why would I need instructions for a basic skirt? After inserting an invisible zipper that was also damn near perfect, I took a little break to pat myself on the back and admire my progress on the awesome skirt! All I had left was the waistband and hem.

After looking at the waistband pieces and realizing they were the same width as the skirt pieces, the little voice in my head said, "Ummm, cocky girl... something appears to be amiss." Yup... the waistband did not have an overlapping tab as I assumed and the zipper was supposed to extend all the way to the top. Dayummmmm. I refused to take out the zipper so I improvised and turned one of my DNP tabs into a closure for the back. The tab is straight even though it appears cockeyed in the photo below.


Summary: I've worn the skirt several times now and overall am very happy with it. I will likely make this one again (with the zipper properly inserted!)

Things I really like: I love the fit. Classic style that is oh-so-comfy to wear.

Things I don't like so much: I wish I had heard Angela's twill tape tip before making it because the skirt does seem to stretch out a bit during the day. I wish I had lined it. When I wear it with tights, it sticks to the tights and rides up as I walk. I'm wearing it today bare-legged and it's fine - no scooching up. Although the fabric is quite comfy, it does wrinkle easily as you can see in my first photo. Not a deal-breaker but somewhat annoying.

Thursday, June 02, 2011

Black / White Dress & PR Weekend


A few months ago, I was thumbing through InStyle or People Style and saw a feature on black/white stripe dresses. I loved the look and decided I needed one! I love wearing knit dresses in the summer. I feel so much cooler and more comfortable than wearing shorts and tops. While in Chicago, I found a wonderful knit at Fishman's Fabrics that was the perfect weight for such a dress.

I started with my tried and true t-shirt pattern - Simplicity 4076, view D - and added length, using one of my fave t-shirt dresses as a template for the bottom. I used black rib trim at the neck and had planned to apply rib to the sleeves, too, but I forgot to lengthen the sleeves. They were too short for a cuff treatment so I simply hemmed them. Only took me an hour or two to sew it up and I had a perfect dress to wear on a hot night at the Taste of Cincinnati!

I found some lovely fabrics during the PR Weekend in Chicago. We visited Fishman's and Rainbow Fabrics in Chicago and the main Vogue Fabrics in nearby Evanston. I had a serious case of fabric envy, wishing I lived closer to such abundant fabric sources! We also stopped at Soutache Ribbon - a great little store full of amazing embellishments. As I look at the fabrics I bought, I have such fun memories of that shopping day and the new friends I made. I look forward to making new clothes that will have the added bonus of bringing back fantastic memories made on PR Weekend Chicago 2011!

So here is my haul:

The "Reds":


My PR roomie, Melody and I found the fun knit shown at the lower right corner in Rainbow Fabrics. It's a tie-dye knit with ribbons of trim sewn right on it. I bought red and she bought blue and my intention was to make a simple t-shirt to wear with jeans. I cut it out right after I got home and attempted to sew it together but neither of my sergers would have anything to do with it! I tried new needles and re-threading but the fabric was definitely fighting and beating the machines! I was able to sew the shoulder and side seams and when I tried it on, it was a definite "meh" moment. I decided it wasn't worth fighting the fabric to finish it off so it ended up in the trash. Boo hoo! But I'm slowly learning that "ya gotta know when to hold 'em, and know when to fold 'em" and I'm proud that I parted with the project, rather than finish it and let it sit in my drawer because I didn't like it.

The rayon on the bottom left was one another PR shopper found, hesitated, and decided not to purchase. I eagerly grabbed the bolt and headed to the cutting table! I plan to make a summer dress from it.

The following fabric is one that was being featured on the wall of Vogue but in a burgundy color. Several PR shoppers were buying that one but burgundy is not a color I like to wear. When I saw it in navy, I snatched it up. I think Jacqui and Kyle also bought it. Our group ended up purchasing the whole navy bolt and possibly the burgundy one, too!


The main fabric is the ecru background with small polka dots but it has a fun border that can be cut up and used to embellish. I stole this photo off Jacqui's blog that shows how the fabric can be used. She has almost finished her dress and I may make the exact same dress since I also have the pattern she used (New Look 6799).


In spite of growing up as a tomboy in a houseful (and neighborhood-ful) of boys, I do love girly clothes and I STILL adore eyelet! I found the following two eyelets at Rainbow Fabrics on our last day.


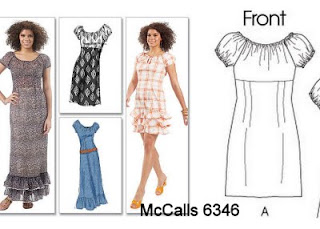
The thread on the red has a beautiful sheen to it. The white has a lovely border as shown and the body of the fabric is a pattern that includes 1/4" holes that repeat every inch or so. Both will definitely require some type of underfabric/lining. I'm thinking the red would be cute for McCalls 6346, View A
I think I am most excited that I found not one but TWO potential fabrics for my Mother-of-the-Bride dress for my daughter's November wedding. I am planning on this Cynthia Rowley design, view C and envisioned it in a teal or peacock blue silk dupioni. Well, I was lucky enough to find just the fabric I had in mind but I also found a fabulous purple stretch taffeta that I also think would be fabulous!


Here are my last pieces of fabric. I'm not sure what I'll do with the black/turquoise knit - I just loved the design. The black/white stretch twill will probably become a skirt.


Finally, on our last day we visited Loopy Yarns that was just a few blocks from our Dorm-Hotel. It was a dreary, cold, rainy day but we were dressed for it. The yarn store clerk called us the Rainbow Trenches!


I purchased 1000 yards of this scrumptious Malabrigo superwash. It will become a sweater someday.

Wednesday, May 11, 2011

Nametag Holder for PR Weekend


I'm heading to Chicago on Thursday for the Pattern Review Weekend - a conference of sorts for sewers. I've watched with envy all the fun everyone has had in weekends past and decided to bite the bullet and join the great group of ladies! They are expecting a record crowd this time with just over 100 attendees.

Weekend activities include organized shopping trips at various fabric and notion stores, sewing lectures / discussions, and a private meeting with the Lieutenant Governor of Illinois, Sheila Simon who is an accomplished sewer! She even sewed her inaugural suit and gown for the inaugural ball! Of course there will be lots of food and cocktails and socializing in between and I can't wait to meet some of the bloggers I've been following for a long time!

One of the optional aspects is to create a nametag holder for the conference. I think there are even prizes for various categories - most bling, largest, etc. Someone mentioned batteries!! Now, I can follow a pattern pretty well but I'm not very creative so when I read about that, I decided I would pass. But while I was at a work conference last week, I was sitting in a session wondering why they always make the nametag lanyards so long. Mine hung down to my waist and I don't need colleagues looking at my stomach when they're trying to remember my name.

As I sat there pondering this and twirling around my nametag (it was a boring session!), I had the thought that if the lanyards were elasticized, they could be shorter and still fit over heads. Which gave me the idea for my simple lanyard. This is certainly not going to win me any prizes but at least it won't clash with my outfits! :-) BTW, where you see my name is where our actual nametags would go. I thought it made sense to put my name in there for example but I realize now it simply looks stupid. LOL

Because it's black, it's a little difficult to see but here is what I did. Made a long tube, finished width approximately 1 1/4". Stitched a tunnel down the middle and inserted a piece of elastic. Stitch it closed and stitched onto a split ring. Made a 1" ruffle piece out of coordinating fabric and glued to the back of the plastic nametag holder. And because I can never leave well enough alone, I added a little yoyo with a bow on top. This holder was recycled from last week's conference.

McCalls 6324


Because this is supposed to be a sewing blog, more about my Derby dress. The pattern is McCalls 6324.

I loved the simple lines of the dress and the exposed zipper adds a little zing! I preferred the little cap sleeve and wanted all one color so I made view C but left off the bottom band. I wanted it to fall just above the knee and without the bottom band, that's where it landed on me with no adjustment.

Although the pattern has a lot of pieces and took some time to cut out, the sewing itself was fairly simple. The directions were clear and easy to follow although I had to read the exposed zipper instructions several times. No fault of the pattern; it was my first time doing an exposed zipper and I wasn't quite sure how it worked. I didn't make a muslin (simple laziness because of all the pieces) but wished I would have because the bodice is a wee bit wider than I'm comfortable with. I should have reduced the width and I probably would have also added about 1/2" to the neckline to bring it in just a smidge. Tip: I marked each pattern piece with its number so I would not get the similar pieces mixed up and I would be sure to keep the right sides out!

Here it is modeled with my Derby hat (purchased on ebay - great source if you want to avoid spending hundreds of dollars on a hat!) I'm standing next to my lilac "tree". It smells beautiful right now!


The bodice and sleeves are supposed to be lined in the same fabric but I used a contrasting fabric for 3 reasons:
  1. The fabric is a lightweight stretch twill and I was afraid it would be too bulky if I doubled up.
  2. I didn't quite have enough fabric to squeeze out the lining pieces anyway.
  3. I thought it would look cute! I LOVE contrasting linings.


Note: Due to my pose, the zipper looks crooked but it's not!

Derby Party 2011

Every year, my neighbors have a Derby Party. They are the best hosts and always create a fantastic party! From the Bourbon Slushies in the frozen drink machine, to the authentic Mint Juleps, the delicious food, the horse "auction" (more later), the door prizes, the flaming shots (somehow they have become tradition although I passed this year), and concluding with a firepit - a good time is always had by all!

The first couple years they included a hat contest and the creations were hilarious! Although the contest has been discontinued, the ladies all still wear "Derby Attire" which of course includes a hat. I found mine on ebay this year at a very reasonable price. Like usual, I made my dress (see subsequent post).

The Hosts (polka dot dress & megaphone/visor) during the horse auction:
Over the years, they have established different methods for betting on the Derby horses. The one that seems to be most popular is to hold an auction and let people bid on the horses. The most expensive went for $160 and the least expensive went for $45. Payoff to top 5 horses and this year the winner received $800! Our horse placed fifth and we received $80 ($20 over our bid).


The Ladies Picture:
Notice the red roses on the table; my neighbor had roses everywhere - they were beautiful!! Note to self: do NOT stand next to beautiful Jen next year. (Notice how she's trying to scrunch down yet her legs STILL seem to end right at my chest level!):


My Daughter and me:
My daughter stopped by before heading to her own party; Isn't she gorgeous!:


Flaming Tequila Shots :
Directions: Pour a shot of vodka. Top with a thin slice of lemon. Sprinkle with powdered sugar. Pour small amount of high proof alcohol (e.g. 151 rum) and light. Blow out flame (in dark to make sure no flame remains!!), take shot, suck lemon.


It was a great time!